
This post is my personal technical note for Cisco HyperFlex Hyperconverged Solution drafted during my personal learning. This post is not intended to cover all the part of the solution and some note is based on my own understanding of the solution. My intention to draft this note is to outline the key solution elements for quick readers.
The note is the second part of the whole note. The first post is per the below link:
Cisco HyperFlex Study Notes (Part 1)
Data Resiliency
RF2 (Redundancy Factor 2) or RF3 (recommended) protection level chosen at the deployment stage.
- RF2 – Lose one full node
- RF3 (under five nodes in a cluster) – Lose one full node or two disks across two nodes
- RF3 (five+ nodes in a cluster) – lose two full nodes
Drive failure scenarios
- Housekeeping drive failure – CVM will be marked as failed and node is marked as failed. But VM can still run by redirecting the data IO though IOVISOR
- Cache and Data drive failure – protected by RF2 or RF3
Logical Availability Zones (LAZ) could be setup as ON or OFF to make DC/Rack/Power awareness and balance the data accordingly.
Key Unique Operation Features
Snapshot scheduler – a plugin in vCenter to schedule the VM snapshot per hourly, daily and weekly.
HyperFlex ReadyClones – Use HyperFlex file system logging to generate one or multiple clone copies in no time.
Network
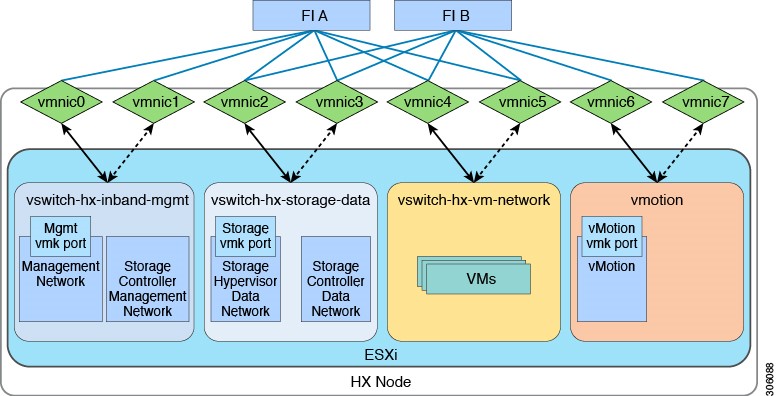
The network requirement can be simply remembered as 4-3-2-1
Four VLAN (vSwitch, and each with 2 uplinks)
- Management
- Data
- VM Network
- vMotion
Three ESXi kernel ports/IPs (for each HX ESXi)
- Vmk0 – Management
- Vmk1 – Storage Data
- Vmk2 – vMotion
Two CVM IP (for each CVM running on HX node)
- Management
- Storage Data
One Management Virtual IP (Floating on one of the HX in the same cluster)
Jumbo Frame will be configured by default and recommended in HX installer.
Deployment
- HX Installer (Virtual Appliance and download from Cisco) need to be deployed first (Support to deploy on VMware Player or Workstation).
- Launch HX installer and follow the wizards. (Wizard for both new cluster and cluster expansion)
- UCS Manager Credentials
- vCenter Credentials
- Hypervisor Credentials
- Server in UCS Domain will be listed for selection
- UCSM Configuration
- VLAN Configuration (4 VLANs)
- Mac Pool
- IP Pool for Out-band-management
- ISCSI/FC storage as an option
- Firmware version
- IP Address for Hypervisor and CVM (3 for Hyper and 2 for CVM)
- Cluster Information
- Cluster name
- RF factor
- CVM password
- VCenter DC and cluster
- DNS/NTP/Domain Name
- Time Zone
- Connected Services
- Jumbo Frame/Data Partitions
- vCenter Single Sign On server if SSO is installed on a separated server
- Post Deployment: SSH to HX installer and run “post_install” command to perform post installation script, like to add vMotion and VM network if required.

Management Notes
Some management note is as per below:
- HX Cluster is managed through HyperConnect
- VMware related operation is managed through vCenter and HyperFlex Plugin
- Only housekeeping drive (datastore) on each node will appear after the initial deployment.
- Need to create user datastore manually (default block size 8KB).
- The new NFS datastore will be mounted on all ESXi in HX cluster.
- VM can be powered on from HyperConnect or vCenter
Snapshot
- A SENTINEL snapshot is created automatically on virtual machine for all HyperFlex workflow and should not be deleted or reverted.
- A HyperFlex snapshot scheduler is available as a plugin in vCenter to schedule the snapshot per hourly, daily and weekly.
Pingback: Cisco HyperFlex Personal Technical Notes (Part 1) | InfraPCS