
This post is my personal study technical note Nutanix Hyperconverged Solution drafted during my personal knowledge update. This post is not intended to cover all the part of the solution and some note is based on my own understanding of the solution. My intention to draft this note is to outline the key solution elements for quick readers.
![]()
The note is the third part of the whole note. The previous posts are as per the below link:
Deployment
Nutanix installs AHV and the Nutanix Controller VM at the factory, re-image in the field if needs other Hypervisor.
Foundation will be used to re-image and create the cluster. Foundation can be accessed via Java Applet or CVM port 8000.
- Discover Nodes
- Discover blocks and nodes
- Set the redundancy factor at cluster level (RF2 or RF3)
- Define Cluster
- Cluster Name/IP
- NTP/DNS
- Network Info (CVM/Hypervisor NetMask/GW, CVM memory, option for backplane LAN)
- Setup Node
- Hypervisor hostname/IP
- CVM IP
- Select Image
- AOS Image
- Hypervisor image (whitelisted)
Post Deployment Check
- Concluding the installation by running NCC (Nutanix Cluster Check)
- Results: Pass/Fail/Warn/Info
- Run from console or by command “ncc” on CVM with below example
- NCC health_checks system_checks ….
- NCC rerun_failing_plugins=True
- NCC health_checks run_all –parallel=4
- Check status, run command on CVM: cluster status.
- Enable remote support service Pulse and Alerts.
Configure the cluster via Prism
Below items will can be configured
- Name Servers
- Network Connections
- File System Whitelist
- NTP Services
- SMTP Server
Non-Configurable Items:
- Local datastore name
- Setting and contents of any Controller VM
- AHV: hypervisor configure/iSCSI/open vSwitch/taking snapshot of CVM
- ESXi: NFS/VM swap location/VM start-shutdown order/iSCSI/Standard Nutanix vSwitch/vmk0 interface/SSH enabled/Host firewall ports/taking snapshot of CVM
- Hyper-V: English Language/Hostname/Internal and external network adapter name/Windows roles and features/Multipath IO/CVM configuration
Cluster Management
Prism Element
- Run on each node with a leader elected to handle HTTP
- Login through Nutanix cluster IP
- Listen on port 80 and 9440
Prism Central
- Support Multi-Cluster management through single console
- Additional capabilities as Calm, Flow and Beam
- Calm – Automation the management of the cluster, Application Lifecycle Management/Customizable Blueprints/Nutanix Marketplace/Governance/Hybrid Cloud Management
- Flow – End to end network management
- Beam – Multi-cloud optimization service (Support AWS, Azure and etc.)
- Access the console by the IP of Prism Central VM
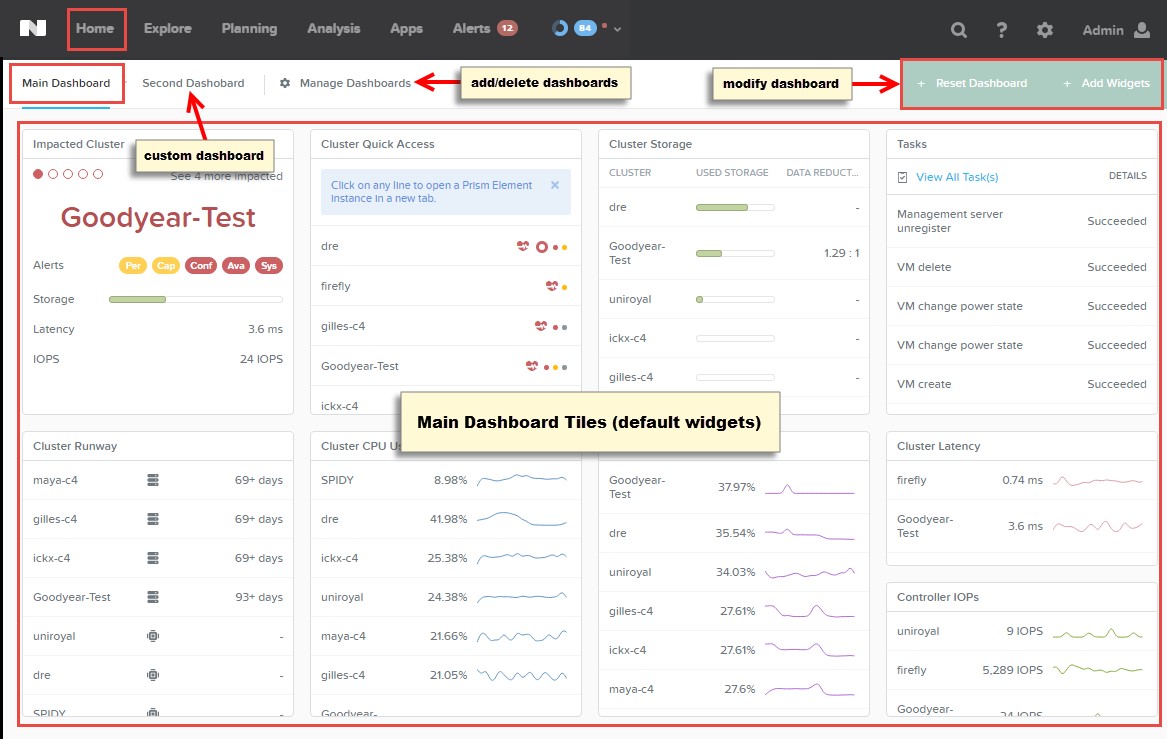
- Prism pro license (60 days trial, per node basis with yearly subscription) adds below features:
- Customer dashboard
- Capacity planning (CPU/Memory/Storage Capacity)
- Advanced search
- Prism pro license can be disabled if needed
- Scenario view is a “as if” scenario to access future resource requirement
- Main tabs: Explore, Analysis, Planning, Calm, Alerts
- Search tab: magnify icon or press slash “/” key
- Explore tab: Support filter, tile view/circles view, group option, action.
- Report tab: customer can define log/background, style, data and report schedule.
- Proxy Whitelist: need when TCP port 9440 is not opened between prism central and clusters and bypass the proxy.
Prism Self Service Portal
- https://cvm_ip:9440/ssp
- Integrated with AD for user authentication
- Components in SSP: Projects (define user and roles)/Roles/Catalog/VMs/Users/Images
- A special view of Prims Central
- Customer support case created on Prism Central
- User
- Prism Central Administrator
- Self-Service Administrator
- Project User
Nutanix REST API (V1 and V2)
- Use HTTP request to get information as well as make changes to the configuration.
- Output of the commands return JSON format.
- REST API Explorer is available for reference on Prism.
PowerShell cmdlets
- Download from Prism web console.
- Common commands:
- Cluster connection: Connect-NutanixCluster -Server xx.xx.xx.xx -Username xxx -Password xxx”
- Connected Cluster Info: “Get-NutanixCluster [-Server cvm_ip] ”
- Cmdlets version: Get-NutanixCmdletsInfo
- Use grid/expand for output formatting.
NCLI – manage the Nutanix Cluster
- Download from Prism web console.
- Can run from local machine (preferred) or any CVM.
- Command format is “entity action p1=value p2=value…”
- Embedded help in command: “entity help” or “entity action help”
ACLI – manage Acropolis portion of the Nutanix product, including AHV host, network, snapshots and VMs.
- Run from CVM by type “acli” at the shell prompt, exit by typing “exit”.
- Command format is “entity.action p1=value p2=value…”
Health Monitoring in Prism Element
- Health Dashboard
- Analysis Dashboard
- Performance data will be kept for 3 months (6 months for Prism Central), output by CSV and JSON format.
- Alerts Dashboard
- Alert Policy
- Create Policy to monitor selected entities and metrics for customer alert.
- Email configuration
- Every alert or daily digest
- Create rules for Email notification
- Create email template
- Alert Policy
Backup and DR
VM-Centric Data Protection
- Time Stream – A set of snapshots stored on the same cluster as the source VM.(Native on-site backup)
- NearSync – New feather since 5.1 to protection the data up to 1 minute (RPO=1 minute). Lightweight Snapshots (LWS) is introduced to create snapshots on the metadata level. Snapshots are stored on LWS store, which is on SSD tier.
- Cloud Connect – AWS/Azure. CVM on AWS/Azure will create a single node cluster with 20TB Capacity. For AWS, S3 is used for data extents and EBS for metadata. For Azure, Azure Blob storage is used for data extents and Blob Storage backed disk is used for metadata. By default, the data transmitted to the remote site is deduplicated. Citrix cloud could be connected by Citrix Cloud Connector.
- Remote replication for off-site backups: site-to-site replication. Snapshot is replicated Async.
- VM snapshot is crash consistent (VSS for app consistency)
- VM snapshot can be taken on a defined schedule or on demand.
- VM snapshot come with an expiration time and Nutanix cluster will automatically delete the snapshot.
- Non-critical files are not included in snapshot. (Swap, log and etc.)
- Remote site – Remote site could be another physical cluster or cloud provider (AWS or Azure)
Protection Domain (Async DR) – A group of VMs backed up locally and optional replicated to remote site. (Active/Inactive)
Protection Domain (Metro Availability) – Specified (active) storage container is synchronized to (standby) storage container with same name on a remote site.
- Witness could be added as an option to enable auto-failover and avoid “split-brain” scenario.
- Three Failure Handling Options – Witness, Automatic Resume (after 10 seconds by default), Manual (All VMs paused).
- Apart from replicating data synchronously to the remote site, the active Nutanix cluster creates and replicates snapshots at a built-in schedule of 4 hours. A user-configured schedule with a replication interval of 4 hours or lower suppresses the built-in schedule. The built-in schedule continues to run if the user-configured schedule is greater than 4 hours. Only metadata is replicated, so a more aggressive replication schedule does not incur a higher replication cost.
Data Protection Strategies:
- Two-Way Mirroring
- One-to-Many Topology
- Many-to-One Topology
- Many-to-Many Topology
Operation Notes
Image Service
- Enable user to import images to virtual management.
- Support raw, vhd, vmdk, vdi, iso and qcow2 disk format.
- Need install virtIO prior to importing for AHV.
- Clone the image after importing.
Security Management
- User access control (Local and LDAP)
- SSL for console access (Disable SSH V2/V3, Enable TLS)
- Key-based SSH for node access
- D@RE through self-encrypting drives
- Data on SED is always encrypted.
- Protection can be disable/enable at any time on cluster.
- Enable protection on cluster required a separate key to access data.
- Each disk has a unique Key
- Use local or remote key management servers (KMS)
- When a node restarts/power cycle, CVM retrieves the key from KMS.
- Support SafeNet keySecure and Vormetrix Key Management Servers.
- No performance penalty.
VM Customization
- Cloud-init – Utility to customize Linux VMs, configuration file is written by YAML.
- Sysprep – Prepare Windows
- ISO for cloud-init/sysprep is mounted on bus IDE 3.
Migration VM from ESXi to AHV
- Pre-migration checks
- Install Nutanix Guest Tool for Windows VM (VM Mobility for Linux)
- Migrate VM disk to DSF
- Convert VM disk by importing
- Create new VM in AHV and attach disks
Nutanix Guest Tools
- Guest Agent service – Communicate with CVM
- FLR CLI – Perform FLR from VM snapshot.
- VM Mobility Driver – In-place Hypervisor conversion.
- VSS requestor & Hardware provider for Windows
- Application consistent snapshot for Linux (By Script)
- Request
- VIP must be configured on Nutanix Cluster
- One empty IDE CD-ROM slot
- Port 2074
Pulse and Alerts Notification (Support HTTP Proxy)
- Pulse – Send status message to Nutanix server every 24 hours
- Alert Email – Enabled by default
- Remote Support Service – Can be enabled for a certain time for remote SSH connection from ncs01.nutainx.ent or ncs02.nutanix .net.
Maintenance
Lifecycle Management
- Command run with locale en_US.UTF-8 only. (check by running /usr/bin/locale)
- Start/stop a cluster: cluster start/stop
- Shutdown a node: Shutdown/Move VM, put host into MM, shutdown CVM (cvm_shutdown –P now), shutdown the host.
- Start a node: Revert sequence. After CVM is powered up, check the cluster status by “ncli cluster status | grep -A 15 cvm_ip_addr”.
- Shutting down more than one nodes need shutdown the cluster first.
- For ESXi patch, shutdown the CVM first before patching.
- Life Cycle Manager
- A framework and a set of modules for inventory and update.
- Independent of AOS, not tie to AOS release cycle.
- Access through Prism interface.
- Two functions: Inventory and update the cluster.
- Log: genesis.log and lcm_ops.out.
Cluster Expansion
- Support below expansion:
- Add new node to existing block (update /etc/nutanix/factory_config.json with rackable_unit_serial & node_position)
- Add new block with multiple nodes
- Add all nodes from existing cluster to another existing cluster
- Node need upgrade or downgrade(re-image) to add to existing cluster
- AOS: /home/nutanix/cluster/bin/cluster –u new_node_vcm_ip upgrade_node
- Re-image is not supported for D@RE nodes.
Firmware Upgrade
- Firmware upgrade type:
- AOS Upgrade – live upgrade from console
- Hypervisor – One node at each time, follow hypervisor instructions and node shutdown procedure.
- Disk firmware – One node at each time.
- NCC – Upgrade NCC with one at each time.
- CVM memory could be expanded by one-click on console.
Pingback: Nutanix Study Notes (Part 1) | InfraPCS
Pingback: Nutanix Study Notes (Part 2) | InfraPCS