
Commvault supports backing up Cassandra database. Cassandra is a distributed database that can handle large amounts of data on multiple nodes. For Cassandra version 3, Commvault support backup log files as well. This post is to outline the high level steps to configure the Cassandra backup in Commvault.
The below configuration applied to Cassandra version 3 and Commvault version 11.18.

In this example environment, the Cassandra version 3 is configured with 3 nodes.
- Tst-cass-301.test.local
- Tst-cass-302.test.local
- Tst-cass-303.test.local
The high level steps to configure Cassandra backup is as below:
Step 1: Install below Commvault Agents into each of the three Cassandra nodes.
- Files System Core
- File System
- Cassandra Agent
Step 2: Add and configure “Cassandra Big Data” client in Commvault. Choose to add a “Big Data Apps” client in Commvault in “Add New Client” window.

Type the Cassandra details in the general information tab and run the discover, cluster name and version will be automatically discovered.

Then, navigate to “Details” tab and configure the data path and commit log path in each node.

Save the configuration and re-launch the properties of the Cassandra instance, enable the log backup and input the archive log location.

Step 3: Modify the /etc/Priam/cvPriam.properties file in each node. An example of the configuration file is as below:
priam.capture.types=true  # Commvault back up the user-defined types
priam.cass.process=cassandra
priam.cass.startscript=service cassandra start
priam.cass.stopscript=service cassandra stop
priam.commitlog.location=/app/apache-acassandra/data/commitlog
priam.cqlhost= Tst-cass-301.test.local
priam.cqlport=xxxx
priam.cqlusername=cass_backup_admin
priam.data.location==/app/apache-cassandra/data/data
priam.jmx.port=xxxx
priam.jmx.user=jmx_backup_user
priam.jmxport=xxxx
priam.ssl.storage.port=xxxx
priam.storage.port=xxxx
priam.thrift.port=xxxx
Step 4: Update Cassandra configuration file $Cassandrafolder\conf\cassandra.yaml to enable the incremental backup. Set the “incremental_backups” parameter to true.

Step 5: Rolling reboot the Cassandra service to apply the new configuration.
service cassandra stop
service cassandra start
service cassandra status
Make sure only one node is rebooted at one time in the same cluster to avoid service interruption.
Step 6: Start the first full data and incremental log backup from Commvault.
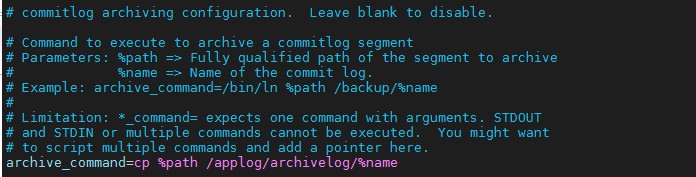
Step 7: Check the Cassandra commit log archiving configuration file $Cassandrafolder\conf\commitlog_archiving.properties. After first log incremental backup, the commitlog_archiving.properties file should be populated by Commvault with below configuration. If not, the archive_command should be manually updated as below:
Step 8: Perform a final rolling reboot the Cassandra service to apply the commitlog archiving configuration, reference the commands in step 5.
For now, the Cassandra backup is configured and both full and incremental backup should work as per defined schedule policy.
The Commvault official document about Cassandra backup is as per below url:
https://documentation.commvault.com/commvault/v11_sp18/article?p=30434.htm